Chapter 25: Prefilling
"Fill the low spots first."
Step 2: The Pre-Fill
In the article, George says the biggest mistake people make is trying to spread out dry micro over an entire piece without first filling the low spots. In most cases, the builder finds out they didn't put the micro on thick enough and they end up with low spots. They end up having to go back and refill and resand the low spots. Once you have a low spot, it's very difficult to bring the low spot back into contour without upsetting the contour of the surrounding micro.
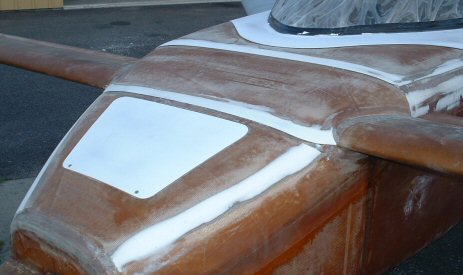
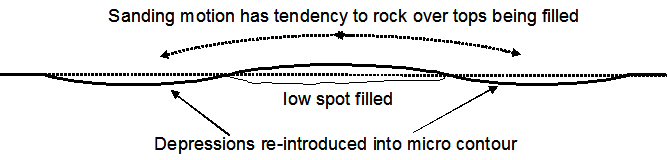
Here's why. When you fill a low spot with a new batch of dry micro, the epoxy that rises and cures on the surface makes that micro patch harder than the surrounding micro that's already been sanded. So any attempt to sand down and level out the new micro patch causes depressions to be sanded into the softer, already-contoured micro. That's what George was referring to when he says, "inconsistent micro patches introduce waves back into the surface." Take a close look at the picture of my wing above and you can readily see the "oops" of my "lesson learned". Low spots stick out like sore thumbs because they remain shiny. (They have no sanding scratches on them.)
George says you need to do it the other way around -- find the low spots first, fill them with dry micro, and bring them into contour with the surrounding, higher surfaces. Some low spots are obvious -- like the deep depressions caused by joggles, low spar caps, and joints. The fishtails on our canard and wings are obvious examples of deep depressions. Some low spots are not obvious -- like low areas on wings and strakes. For example, if you overfilled your spar caps, you're likely to have wide low spots on each side of the spar caps! I didn't do any prefilling because I didn't think I needed to. I under-estimated its importance to the contouring process. So lesson learned, the pre-fill is definitely worth the time and effort. I was more attentive to pre-filling as I started other pieces of the airframe.
The Pre-Filling Process
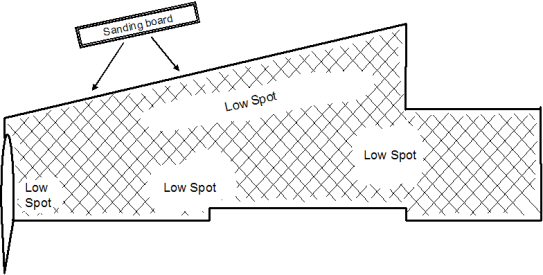
1. Find the low spots by taking your long sanding board and lightly sanding the entire piece at alternating 45-degree angles. The sandpaper will leave scratch marks on the high spots. The low spots won't have any scratches at all! You can also find low spots by spanning the piece with a metal ruler or straight-edge. Move it over the surface and look for daylight under the ruler. These are the low spots. Take a pencil and outline the low spots. Don't use a sharpie marker because the ink will eventually bleed through the dry micro, primer, and eventually the paint.
2. Prep-sand the low spots with your favorite grit of sandpaper. I use 36 grit. I also used sand blasting to prep large surface areas. Don't go hog-wild here. All that's necessary is to take the shine off the surface to provide a good mechanical bond for the micro. Vacuum the piece thoroughly.
3. Mix up a batch of dry micro. I mix my own using WEST System 105 resin, 206 slow hardener, and micro-balloons. West dry micro is the tried and true filler used by most of the canard community. There are pre-mixed fillers on the market (e.g., Superfill), but they are much heavier and more expensive than West dry micro. Whatever you do, don't use polyester-based fillers. They shrink up with age. As said in the article, you mix the epoxy first, then add in the micro-balloons. Stir until you get a mix with the consistency of cake frosting. Properly mixed micro spreads with moderate difficulty and it requires a fairly high amount of pressure to spread it. If it spreads easily, it's too wet! If the micro is shiny, it's too wet! I mix the epoxy in a Dixie cup, pour the epoxy into a one-half gallon pail, then start adding the micro a little at a time until I sneak up on the right consistency. If the mixture appears shiny or runny, I add a little more micro. If the mixture gets lumpy and flakey, then I added too much micro. I fix it by adding a little more epoxy. Try to find a happy medium. With experience you will find a ratio of epoxy and micro that gives you the perfect consistency each and every time. Remember those ratios. Write them down and don't forget 'em.
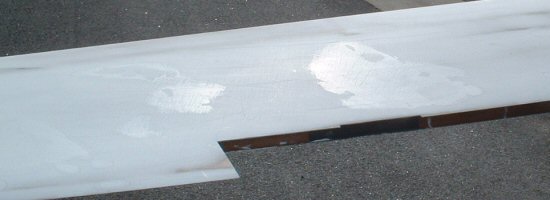
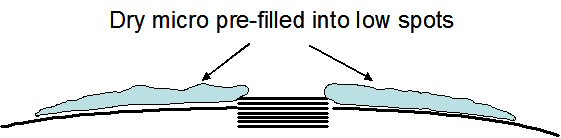
4. Fill the low spots with the dry micro. Put a blob in the center of the low spot and spread it outward past the outline, overlapping about an inch or so onto the higher surrounding surfaces. Try to spread the micro so that the low spots are filled even with, or very_slightly_higher than the surrounding surfaces. I know the article says to pre-fill to within 1/8th inch below the surrounding surfaces. I'm going to humbly disagree with that, only because it's nearly impossible to judge how thick the micro is going on when you're spreading it. It's far easier and less troublesome just to spread the dry micro a little high, then contour it flush with the surrounding surfaces. The example shown here is of a spar cap that was filled with too much spar cap tape, resulting in low spots ahead of and behind the spar cap.

You can wait until full cure to do this, or if you time it just right, you can use a technique called "cheese grating". Cheese grating significantly reduces the time and effort required to sand off the micro. Here's how you do it. Apply the dry micro, wait 1-2 hours for the micro to "green", then sand the micro with 36 grit. "Greening" is the technical term for micro that is beginning to cure. You'll know when the micro is greening because it gets rubbery. If you're using WEST, the micro will "green" about 1-2 hours after you apply it. The micro is hard enough to be stable, but soft enough that it sands off soooooooooo easily. It comes off in large quantities, like dragging a block of cheese over a cheese grater. (Hence, the name "cheese grating". Clever, huh?) When Nick Ugolini first told me about cheese grating, I was skeptical. But after trying it, all I can say is "Wow!" Instead of waiting a day for full cure, I was sanding within 2 hours of application. What took an hour to sand off took only a few minutes. As an example, it took me only 20 minutes total to sand off these pre-filled areas on the nose hatch, nose top, canard cover, and forward canopy deck.