Chapter 25: Filling the Nose, Canard Cover, and Forward Deck
After big filling the canopy, I pressed forward with contouring the forward deck, the canard cover, and the top of the nose. Ideally, the canopy deck, removable deck, and everything else forward of that should be contoured all at the same time. So, you actually contour the entire top of the airplane in one fell swoop.
Inspections and Repairs
No repairs needed. But I did add the one-eighth inch flange on the sides of the removable forward deck like I did on the canopy. I also drilled two holes in the nose door and installed two nutplates in the nose top. I once had delusions of grandeur and was holding out for a more elegant attachment method, such as hinges and internal locking mechanism. But the funny thing about contouring. It forces you to finish off parts of the airframe that you've been putting off for years.
Surface Prep
All pieces had been peel-plied. So I just prepped the surfaces by hand sanding.
Pre-Filling
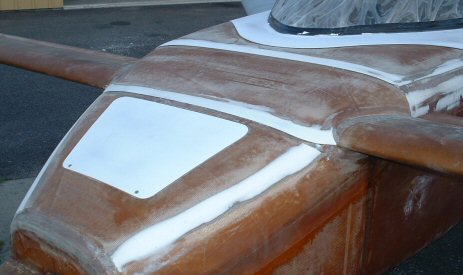
The picture below shows the spots that I pre-filled. In general, the low spots were over the BID lay-ups that attach the nose top to the sides, and along the forward and aft flanges on the canard cover. Please note that I reversed the flange between the aft edge of the canopy cover and the removable forward deck. Instead of the canard cover overlapping the forward deck, I have the forward deck overlapping the canard cover. I did this so I can remove the forward deck without taking off the canard first. Reversing the flange also keeps water from draining into the plane when it is parked. So my prefill is actually on the forward edge of the removable deck. I also prefilled along the sides of the removable deck where I installed the one-eighth inch flange. Finally, I prefilled -- or should I say "big filled" -- the entire nose hatch so as to be able to tape it later to form the seam between the hatch and the nose top prior to big filling.
I cheese grated all the pre-filled areas. All the prefilled areas you see in the picture were done in about 4 hours. I applied the dry micro, let it set up for 2 hours until it was rubbery, then leveled the micro with 36 grit. I have to say that cheese grating is a wonderful thing!
Big Filling
I applied box sealant tape to all seams, and boy are there alot of seams. It took more time to tape up the seams than it did to spread the micro! I mixed up the dry micro and big filled the entire top of the airplane. I also big filled part ways down the fuselage sides to prepare fore contouring the rounded edges. For some reason my canard cover and its intersection lines with the canard were not symmetrical on both sides. The port intersection was more outboard than the starboard side. So I made a template of the port side and traced it onto the starboard side. I outlined it with some masking tape and filled that area of the canard cover with a second helping of dry micro. After spreading it and smoothing out the bumps and lumps, I peeled the tape off to leave a clear, sharp edge to the micro.