Chapter 25: Filling the Canopy and Turtleback
After getting the wings and strakes into final primer, I decided to tackle the canopy and turtleback. The distinct challenges are dealing with joggles, window edges, hiding the hinges, and contouring the cosmetic strake fairings evenly. This will also be my first opportunity to use the contouring process in its entirety. I had always been in the middle of it when I discovered/learned the proper techniques.
Inspections and Repairs
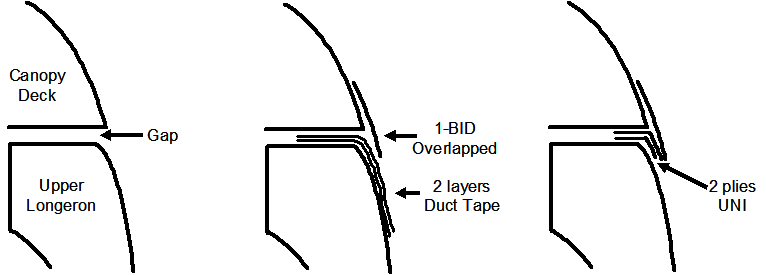
No repairs were needed. But... my canopy only fits right in the month it was finished. Any other time it develops gaps between the canopy frame and the upper longerons. I simply can't tolerate it doing that. So I added a flange down both sides of the canopy to overlap the outside of the top longerons by about an 1/8th of an inch. (That was almost not enough. I now wish I had made the flange with a >1/4-inch overlap.) Besides being cosmetically appealing, the flanges will seal off wind and rain. What I did was tape off the longerons with 2 plies of duct tape, closed the canopy, then overlapped 1 ply of BID from the canopy deck onto the upper longerons. Once cured, I removed the canopy and glassed 2 plies of UNI (45 degree bias) from the underside of the canopy deck onto the inside of the 1-BID flange. The 2 plies of duct tape approximated the thickness needed for the 2 plies of UNI with a little extra margin for paint thickness later on. I used 2 plies of UNI instead of 1 ply of BID because the UNI is thinner than BID. Once that cured, I trimmed the layup for a one-eighth inch overlap. (I wish I had trimmed it to 1/4th inch.) I also did this very same thing to the removable forward canopy deck. The drawings are a bit exaggerated. The "bump" is easily covered over with the dry micro for contouring.
Surface Prep
My canopy and turtleback were peel-plied. So I just prep-sanded the surfaces by hand.
Pre-Filling
As you might expect, the low spots are at the depressions where cut lines were made and where the flanges were added. That would be at the canopy/turtleback cut line and the cut line on the forward canopy deck. I filled three additional low spots that you may not have on the turtleback just aft of the canopy bubble, around the perimeter of the glass bubble, and near the upper cowl flange. Prior to glassing the outer canopy skin in Chapter 18, I purposely carved a groove into the foam along the canopy bubble to avoid high spots. So, for me that was a low spot to be filled. The other two areas were to fill waves left from the multi-BID plies that make up the cowl flange and canopy attachments.
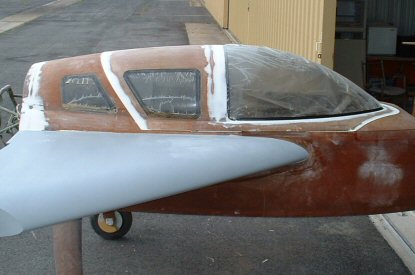

Before starting the prefilling, I applied more tape along the edges of the windows and canopy bubble. The buildup acts like a dam to pile the micro against without getting it all over the windows. It makes it easier to create a fine edge, and the edge stays visible while sanding the micro flush. Once the micro is cured, I removed the tape one layer at a time until I was back flush with the outer skin. This concept is illustrated below. Whatever you do, ensure that you have enough tape on the windows at all times to prevent the sanding block from scratching, SCRATCHING, SCRATCHING the windows. That will ruin your day.

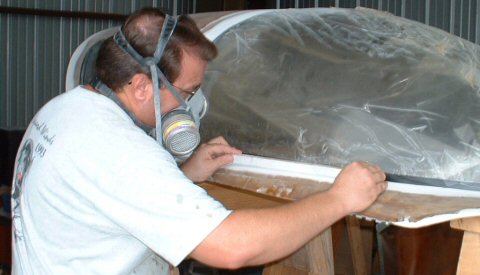
A substantial challenge is getting the canopy deck to be even all the way around the canopy bubble. This is how I did it. I moved my canopy tape line up 1/8th-inch above the outer skin. I'm doing this on purpose to allow room for the micro contouring and to radius the edge with some sort of eventual cosmetic window treatment. I built up the tape line to create a dam, then stuffed micro under the tape. I made a sanding stick by wrapping some 50-grit sticky back sand paper onto a 3/4-inch square stick about 1 foot long. The sanding paper was applied on two adjacent sides only. In this manner, I could hold the bare wood side of the stick against the canopy tapes without fear of eroding the tapes or inadvertently scratching the canopy glass. If I needed to, I could flip the stick over with one side of the paper facing the glass to finesse the edge of micro against the canopy, or to remove any stubborn micro that stayed stuck onto the tapes. Holding the stick level, I sanded along the canopy line using long strokes until I eventually sanded down to the bottoms of the tapes. With the stick being 12 inches long, it naturally levels out the micro like a plane sander does on wood! I kept sanding until I could just barely see daylight from under the tapes. I finished it off by rounding off the micro and fairing it in with the fiberglass surface. Remember that I'm just doing the prefill right now, so it doesn't have to be exact. I'll recoat the entire canopy later in the Big Fill and finesse the final contour at that time.

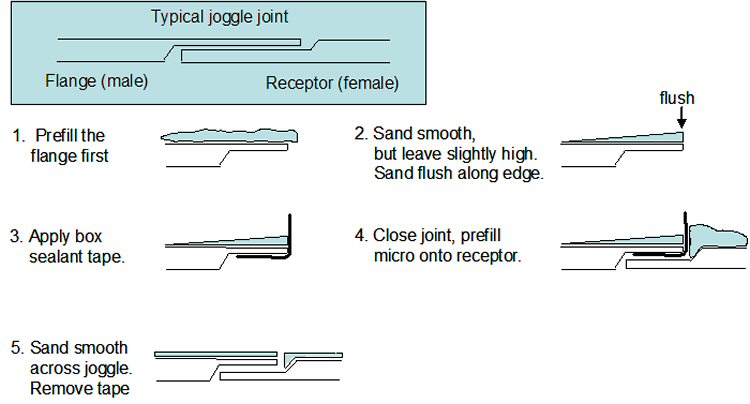
The final major challenge for the prefill is the micro treatment at the joggles. This is easily handled by contouring the flange first, filling the receptor next, then contouring the flange/receptor at the same time. I've illustrated the process below. Since the canopy has the two flanges, I removed the canopy from the plane and prefilled the flanges first. I installed the canopy back onto the plane, then prefilled the receptors. I finished up by contouring across both sides of the joint. In principle this same process will be repeated at all joints: (1) turtleback to upper cowls; (2) removable forward deck to canard cover; (3) canard cover to nose top; (4) nose hatch to nose top; (5) ballast access door to nose cap (bet you forgot that one!); (6) landing brake to fuselage bottom; (7) landing gear cover to fuselage bottom; and (8) lower cowl to fuselage bottom/sides. You will have other joints if you have gear doors, fairings, and the like. Just remember, it's fill the flange side first, then fill the receptor side.
I cheese grated all the pre-filled areas. Cheese grating is applying the dry micro, letting it cure for about 1-2 hours, then sanding it with 36-50 grit. The micro is somewhat soft, yet is just hard enough to be sanded. The sanding goes really easy and the micro is removed in large quantities. The micro is like dragging a cheese grater across a block of mozzarella cheese. It saved having to wait overnight for full cure before sanding. All the pre-filling you see here was accomplished in one session.
Big Fill
Just before starting the big fill, it occurred to me that I better do something about the swoosh line. You know, the line that follows above the cosmetic strake fairings? Cosmetically, I wanted this line to be sharp and contrasted, and continuous without discontinuities. The cosmetic fairings should actually establish the swoosh lines for you, but my strake fairings did not end up continually swooshed -- for whatever reason. So, I masked off the swoosh line with some tape. The tape was placed above the swoosh line.
It's easier to big fill the canopy with it off the airplane. So I cut the swoosh tapes over the seam between the canopy and the turtleback. I removed the canopy from the airframe and placed it onto a table. I big filled the cosmetic fairings first and peeled away the tape, leaving a clearly defined edge to the micro. I big filled the canopy frame, then did other things while waiting for the micro to green. Once it had partially cured, I big filled the rest of the canopy. After the micro cured, I squared up the forward flange, aft flange, and the bottom of the canopy deck flanges. I applied some box sealant tape over the flanges to form the seams. I put the canopy back onto the airframe and installed the hinge pins. To keep from making a future mess, I applied strips of duct tape to the tops of the strake and butted them against the upper cosmetic strake fairings and fuselage sides. I big-filled the part of the cosmetic strake fairings that are on the turtleback and left it to green up. I big-filled the areas over the outside of the top longerons (the parts that are below the canopy deck), and because I wanted to contour the rounded edges, I also big filled part ways down the fuselage sides. Once the dry micro was applied and the bumps and lumps smoothed out, I peeled off the duct tape from the strakes, leaving a nice, sharp line in the micro. I big-filled the forward deck, canard cover, and nose top and sides. By the time I had done that, the micro on the turtleback fairings had greened enough for me to finish big filling the remainder of the turtleback.
I contoured the turtleback, canopy, and the nose at the same time. (See Contouring the Top of the Fuselage.)