Chapter 16: Forward and Aft Controls
Step 4: Installation of Forward and Aft Control Systems
Mounting the Bearing Blocks
In the old days, the mounting of the bearing blocks was a critical step. You had to install the entire system to ensure the tubes and phenolic bearings remained perfectly aligned to each other as the flox cured. With the advent of swivel bearings, those days are long gone and the installation is a breeze. I floxed the bearing blocks without assembling the entire system. I just ensured the blocks were mounted in the proper locations, and that they were at 90 degree angles to the fuselage sidewalls during the cure. I used drywall screws to hold my bearing blocks in place. I drilled two small holes through the side of the fuselage and into the sides of the bearing blocks. I screwed in the drywall screws from the outside in. I didn't even have to ask the neighbor for assistance! :-) I added the triangular braces later when I was doing Chapter 24.
Installation of the Forward and Aft Control Systems
Re-assembly is a breeze, especially since I labeled and indexed all the parts. Again, I was careful when handling the universal joints. It’s easy to dislodge the orange rubber protective boots and it’s easy to inadvertently squeeze out the grease that’s in there. I intend to use the Hanka Roll Trim system, so I didn't install the horns on the CS107's. Once everything was together, I dimpled the bronze firewall bearings, inserted the CS122 firewall cranks, and did a trial fit with the aft torque tubes. Happy with the fit, I buttered up the bearings, and inserted them and the cranks through the firewall, inserted the crank tubes into the aft torque tubes, and left the bearings to cure in place.
 |
| Firewall Bearing |
Final Drilling of the CS122 Firewall Cranks
Whoa, stop the horses! Eventually, I got to the part in Step 4 where the plans had me drill and bolt together the CS122 firewall cranks and CS121 torque tubes. Having blindly done it that way the first time, I found it easier and better the second time around to wait and drill these holes after the aileron controls are installed and rigged.
Here's why.
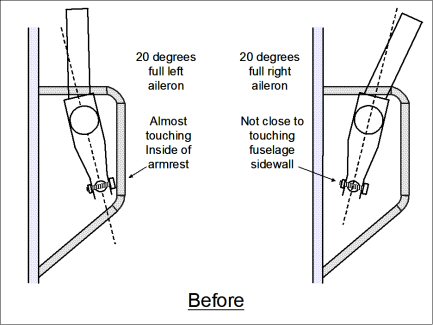
As mentioned in the general comments, I found that when my control sticks were rolled hard-over to the left and to the right, the bottoms were almost touching the insides of the armrests. Yet they weren't even close to touching the fuselage sidewalls. This makes sense since the insides of the armrests are closer to the centers of the bearings than the fuselage sidewalls. It's also my own fault for building the armrests before finishing the control systems. I built the consoles hoping the dimensions in Chapter 24 would fit my plane. But nooooooo, I guess my mileage varied.....ALOT. If done in the order of the plans, the builder would simply build the consoles out a bit to clear the sticks.
By waiting to drill the CS121s and CS122s, I was able to evaluate the handle movement needed for full aileron travel, then chose a handle orientation that balanced out the clearances. Likewise, I was able to ensure the orientation didn't place my hand or the stick too close to the fuselage sidewall.
This worked for me because I knew in advance that I was going to whack the 0.5-inch stub off the control handles and replace it with a 1-inch stub (see Control Handles). So, my plan all along was to balance out the clearances at the bottom of the sticks, then weld on the new stub at whatever cant angle was required. If a builder wishes to stay with the stock Brock stick (say that fast 10 times), then the builder must either accept the cant angle that results from biasing the controls, or don't bias the controls and simply build the consoles out a bit to clear the sticks. I didn't want to modify my already-built armrests, so biasing the controls worked especially well for me.
Either way, I still feel it's a good idea to wait to drill the CS121 and CS122 tubes until after the aileron controls are installed and rigged.

At this point, I jumped forward in the plans. I fabricated and rigged the aileron controls, then did the final drilling of the CS121 and CS122 tubes.