EFIS is User Friendly
I had the opportunity recently to fly as a test subject (pilot) in a NASA flight experiment. The goal is to determine if pilots could fly precision approaches better with EFIS and Highway In The Sky than with traditional instruments. The short answer is, yes!
The experiment was conducted in a Piper Aztec twin. The left seat was outfitted with the traditional round dials and the right seat was outfitted with an experimental Primary Flight Display (PFD). The PFD had the usual EFIS presentation, including attitude, horizon, an airspeed tape on the left side, an altitude tape on the right side, vertical speed, and magnetic heading shown across the bottom. It had gray-scale terrain mapping too. (More on that later.) The center stack had a CNX 80 and MX 20.
The real deal was the Highway In the Sky. I've seen HITS presented as predictor boxes that you fly through, like you see on Microsoft Flight Simulator. The FAA is finding out that the predictor boxes are "too busy". They move all over the place -- like they're on the end of a whip -- and this really bugs the crap out of the pilots. So the FAA is evaluating different ways of depicting the HITS symbology.
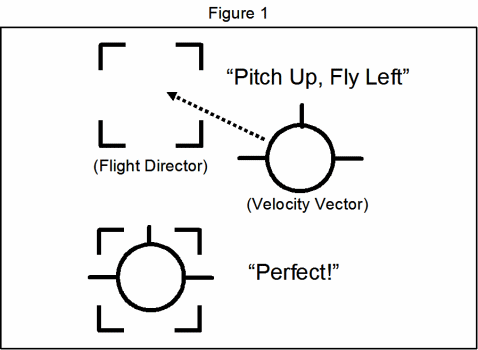
This particular evaluation had the HITS presented as a flight director box (where the navigation wanted you to be) and a 4-second velocity vector (position predictor showing where you'd be in 4 seconds from now based on where the airplane was pointing). All this was riding on the course ribbon (the highway). You "drove" along this highway, trying to stay "in the lane". It looked and felt like I was driving a race car on a race course in a video arcade game. As you can see in this picture, the whole objective is to keep the airplane in the box! Keeping in mind of course that what you're really doing is keeping your PREDICTED position (the velocity vector) aimed in the same direction as the PROJECTED course navigation (the flight director). These two bugs tell you EXACTLY how to steer the plane. If the two are overlayed, then you're right where you need to be. You still must keep an eye on the "Flying W" that depicts your actual attitude. It sounds rather complicated to coordinate all three, but trust me, it was very, very intuitive.
The exercise was to fly six RNAV(GPS) instrument approaches under simulated IFR (with the hood on). Since I was arbitrarily assigned as an even-numbered pilot, my first three approaches were flown from the right seat using the PFD. The last three approaches were flown from the left seat using the traditional round instruments. (To keep from corrupting the data, the odd-numbered pilots flew from the left seat first so as not to favor one system over the other.) I was free to use the CNX-80 and the MX-20 at my discretion for all six approaches, but under no circumstances was I to cheat and look at the round dials on the left side of the plane. The conditions of the experiment were that I received NO training on the PFD and NO training on the Aztec prior to the flight. They basically chunked me in the plane and made me fly the experiment cold. So here I was, a 350-hour single engine land pilot with no twin-engine time, with NO clue about power settings and configuration changes, about to fly IFR approaches in an Aztec with a new experimental EFIS display. Oh, and by the way, the plane would be broadcasting a differential GPS signal being tracked and recorded by a NASA telemetry van parked on the approach airport's tarmac. The guys in the van would know our altitude and location to within a foot.
The NASA pilot-in command did the take-off from Patrick Henry Field (KPHF) and handed the plane over to me at 1,000 feet. I pointed the plane toward Wakefield Airport (KAKQ) so we could fly the approaches. I'd have a whole TEN MINUTES enroute to figure out the EFIS display and get comfortable with flying the Aztec before beginning the first approach.
The RNAV/GPS approach used in this experiment was configured as a "T", which means I had a 90-degree turn to make at the top of the "T" in order to line up with the runway. I had never flown a "T" approach, I was not used to shooting approaches with a 90-degree intercept angle, and I certainly had never done this in something as unfamiliar to me as the Aztec! I knew the turn was coming up fast because I could see the 90-degree turn showing up as plain as day in the course ribbon. The picture doesn't show this enough, but the course ribbon really did convey a tight, high-banked, 90-degree "curve in the road".
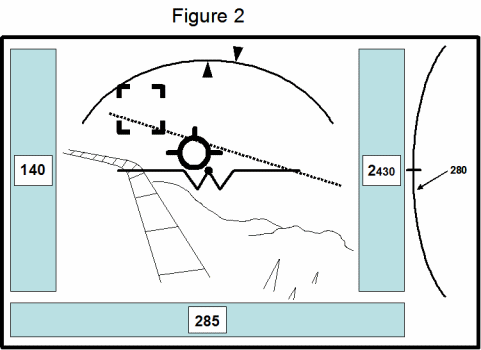 As
I initiated the turn, there was no doubt I was going to screw it up because
the flight director (projected course) started going left and the velocity vector
(predicted position) went
right. It was clear I didn’t anticipate the turn rate enough and I was
having trouble compensating for the Aztec's heavy controls. The
picture on the left shows what happened to me. The course ribbon is
telling me that I've run off the road and I'm going right of projected course. The flight director is telling me I need to pitch up and steer
left to regain the course. The velocity vector is telling me I'm trying
to steer back towards course, but I need to steer even more left if I'm ever going
to catch up to course. You can see from the Flying W that I'm rolled over
left trying to make the turn, but the airplane is pitched down because I
haven't yanked back hard enough on the yoke to compensate for turning.
My altitude has fallen from the 2,600 feet I'm supposed to maintain on this
leg of the approach.
Had I been a more astute observer I would have noted that the bank angle on
the course ribbon was telling me the bank angle required to make the turn.
The bank angle required in this case was greater than a standard rate turn.
Since I was trained to never exceed the bank angle for a standard rate turn,
(and especially since this was my very first TURN of real significance in the
Aztec), I was really reluctant to yank and bank it.
As
I initiated the turn, there was no doubt I was going to screw it up because
the flight director (projected course) started going left and the velocity vector
(predicted position) went
right. It was clear I didn’t anticipate the turn rate enough and I was
having trouble compensating for the Aztec's heavy controls. The
picture on the left shows what happened to me. The course ribbon is
telling me that I've run off the road and I'm going right of projected course. The flight director is telling me I need to pitch up and steer
left to regain the course. The velocity vector is telling me I'm trying
to steer back towards course, but I need to steer even more left if I'm ever going
to catch up to course. You can see from the Flying W that I'm rolled over
left trying to make the turn, but the airplane is pitched down because I
haven't yanked back hard enough on the yoke to compensate for turning.
My altitude has fallen from the 2,600 feet I'm supposed to maintain on this
leg of the approach.
Had I been a more astute observer I would have noted that the bank angle on
the course ribbon was telling me the bank angle required to make the turn.
The bank angle required in this case was greater than a standard rate turn.
Since I was trained to never exceed the bank angle for a standard rate turn,
(and especially since this was my very first TURN of real significance in the
Aztec), I was really reluctant to yank and bank it.
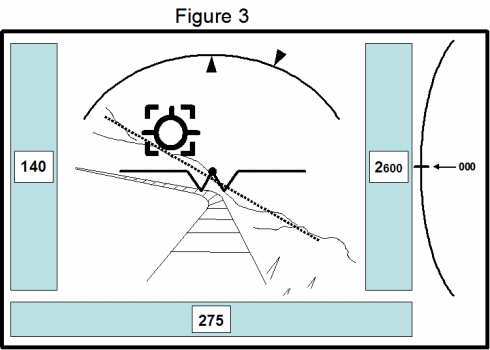 On the second approach I was much better prepared
to anticipate the turn and to more aggressively follow the bank angle cues from the course
ribbon. I flew the turn with much greater precision. If you're doing
everything right, you'd see what's depicted here. I've got the Flying W
riding on the highway, so the plane is on course for the turn. I'm keeping the velocity vector
predictor solidly in the flight director box, so I'm making the turn at the
correct rate. I'm exactly where I
need to be. I found it interesting that the flight director is shown as
being
slightly above the horizon while in a level turn. This makes perfect sense
because it knows you have to pull back slightly to hold altitude while
turning. It gives you the queues to do just that. Note the
altitude is fixed at 2,600 feet like it's supposed to be per this leg of the
approach.
On the second approach I was much better prepared
to anticipate the turn and to more aggressively follow the bank angle cues from the course
ribbon. I flew the turn with much greater precision. If you're doing
everything right, you'd see what's depicted here. I've got the Flying W
riding on the highway, so the plane is on course for the turn. I'm keeping the velocity vector
predictor solidly in the flight director box, so I'm making the turn at the
correct rate. I'm exactly where I
need to be. I found it interesting that the flight director is shown as
being
slightly above the horizon while in a level turn. This makes perfect sense
because it knows you have to pull back slightly to hold altitude while
turning. It gives you the queues to do just that. Note the
altitude is fixed at 2,600 feet like it's supposed to be per this leg of the
approach.
 After completing the turn and tracking inbound straight and level on the
localizer, the Flying W (actual attitude) will essentially converge with the
other two symbols. As shown in this picture, all three will eventually overlay each other as an
indication that you're flying straight, level, and on course. I simply
wait now for the CNX80 and the MX20 to count down the miles to the Final
Approach Fix (FAF). As I approach the FAF, I can actually SEE it on the
EFIS. I can see the "hump in the road" where the course ribbon goes from
being horizontal to falling away from the plane on a steady downward slope to
the runway. It's the exact spot where I need to initiate the
pushover for the glideslope intercept. (I've tried to depict this in the
picture. The "hump" is just to the right of the tallest tower.)
After completing the turn and tracking inbound straight and level on the
localizer, the Flying W (actual attitude) will essentially converge with the
other two symbols. As shown in this picture, all three will eventually overlay each other as an
indication that you're flying straight, level, and on course. I simply
wait now for the CNX80 and the MX20 to count down the miles to the Final
Approach Fix (FAF). As I approach the FAF, I can actually SEE it on the
EFIS. I can see the "hump in the road" where the course ribbon goes from
being horizontal to falling away from the plane on a steady downward slope to
the runway. It's the exact spot where I need to initiate the
pushover for the glideslope intercept. (I've tried to depict this in the
picture. The "hump" is just to the right of the tallest tower.)
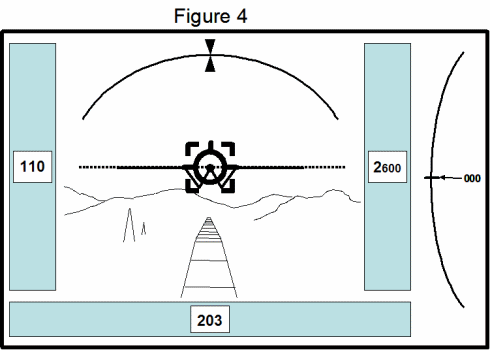
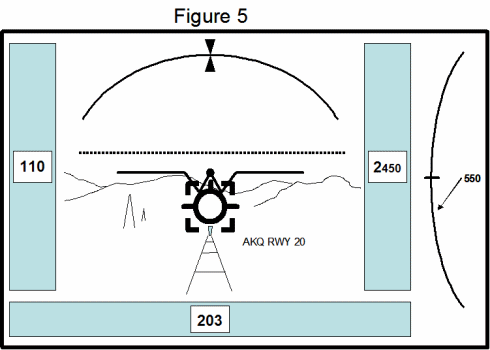 Having already taken a lesson from the bank
angle cues, I quickly realize that the slope of the course ribbon is giving me
a good feeling for how much I'll have to point the nose down if I'm to keep up
with the flight director's projections and stay glued onto the highway.
The picture here shows what the EFIS looks like as you begin the push-over at
the FAF. The course ribbon is falling away from you. The flight
director is telling you to nose over a little more because it is located a few
degrees below your actual pitch attitude. The velocity vector is nailed
in the flight director box, telling you that you're doing a great job of
transitioning onto the glideslope. Note that my altitude is decreasing
and I've started a 550 foot per minute descent. I'm on a steady heading
of 203 to stay locked on the localizer.
Having already taken a lesson from the bank
angle cues, I quickly realize that the slope of the course ribbon is giving me
a good feeling for how much I'll have to point the nose down if I'm to keep up
with the flight director's projections and stay glued onto the highway.
The picture here shows what the EFIS looks like as you begin the push-over at
the FAF. The course ribbon is falling away from you. The flight
director is telling you to nose over a little more because it is located a few
degrees below your actual pitch attitude. The velocity vector is nailed
in the flight director box, telling you that you're doing a great job of
transitioning onto the glideslope. Note that my altitude is decreasing
and I've started a 550 foot per minute descent. I'm on a steady heading
of 203 to stay locked on the localizer.
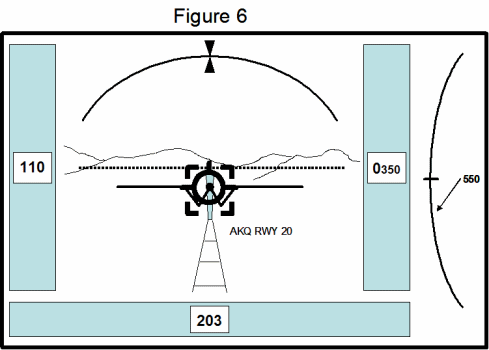 Once I stabilized the approach, all three
symbols once again converge. At this point in the approach, I begin to PANIC
because I can't "find" the localizer or the glideslope needles anywhere on the display. A
second later I'm literally laughing at myself because I realize the course
ribbon IS the glideslope and the EFIS provides it right there for you
to see/follow!! Plus, as long as I keep the vector in the box, I
am guaranteed to be on localizer, on glideslope. The whole time I'm going down the pipe,
a picture of the runway begins to form at the end of the course ribbon,
looking very much like the proverbial light at the end of the tunnel. The symbology
said I was headed for AKQ RWY 20. Now how cool is that? A very
comforting feeling. If this had been an LDS approach with a 30-degree
offset, I would have seen the runway pictured with that offset. Had we approached perpendicular to the runway, the
runway would have appeared sideways. This picture shows the EFIS just
before I reached the decision height of 300 feet.
Once I stabilized the approach, all three
symbols once again converge. At this point in the approach, I begin to PANIC
because I can't "find" the localizer or the glideslope needles anywhere on the display. A
second later I'm literally laughing at myself because I realize the course
ribbon IS the glideslope and the EFIS provides it right there for you
to see/follow!! Plus, as long as I keep the vector in the box, I
am guaranteed to be on localizer, on glideslope. The whole time I'm going down the pipe,
a picture of the runway begins to form at the end of the course ribbon,
looking very much like the proverbial light at the end of the tunnel. The symbology
said I was headed for AKQ RWY 20. Now how cool is that? A very
comforting feeling. If this had been an LDS approach with a 30-degree
offset, I would have seen the runway pictured with that offset. Had we approached perpendicular to the runway, the
runway would have appeared sideways. This picture shows the EFIS just
before I reached the decision height of 300 feet.
Each approach with EFIS got better and better. Next, we landed at AKQ so I could swap to the left seat and fly the same approach three times using the traditional instruments. Wow, did everything seem foreign. Whadya mean I have to watch 7 instruments? I felt behind the airplane and I felt behind the navigation. I wanted so badly to cheat and take a peak at the EFIS display. The NASA PIC knew better and had covered up the EFIS display. I have to admit that I just don't fly alot these days. I am building a Cozy and I tend to use my money and my spare time building it. So I'm not especially sharp right now. But I had completed an IFR competency exam not more than 4 weeks prior to this flight and I had spent some time flying my IFR desk top simulator. I felt competent and safe before the flight. However, after using the PDF, I didn't feel so competent on the gages anymore. I already knew what the results of this experiment would be.
So, how did I do? Well, on the traditional instruments there were times when I wandered off course by as much as 0.3 miles and wandered off glideslope by as much as 50 feet. With EFIS, my largest errors were 50 meters laterally and SIX FEET in altitude.
So far, for all pilots, the experiment is showing a 5:1 improvement in approach accuracy using the EFIS PFD!!! The theory is that pilots are REACTIVE to traditional needles, meaning you have to first observe the needles, make the needed corrections, and wait to see if the corrections worked or not. By the time the needles move you're already behind the navigation. The PDF software is PREDICTIVE. When the predicts start to move, you have enough time to alter course to stay AHEAD of the navigation. I can personally say I enjoyed having the one display to look at. I found that with EFIS, I didn't watch the CNX-80 or the MX-20 very much. Except for distance, most everything I needed was there in front of me on one display.
I learned several other things during my debrief. The FAA is finding out that pilots prefer a gray-scaled terrain map. Pilots are complaining that the colorized terrain maps show way too much detail and are too bright and too busy. The greens, yellows, and reds tend to draw attention away from the basic flying information. The textural information gets overpowered by the terrain and seems to become "lost". The FAA is also working with industry to set a standard for what constitutes an "appropriate" bank angle during turns. Bank angles for turns are of course a function of airspeed, but the issue is not all airframes can turn safely using that formula. This would explain why the bank angle for this experiment was so high. The control group of pilots is flying this same experiment and using the same PFD in the fixed-based Malibu simulator. The scientists are noting all kinds of interesting things about pilots. A funny one is pilots tend to fixate on the PFD, especially on seeing the little picture of the runway. A few of them on the simulator flew through decision height and right into the runway! So there's still some tweaking left to be done with the final product. I'd like to see them add tick marks on the arc to show what the bank angle is, provide tick marks to show the roll attitude needed for a standard rate turn, and provide some localizer and glideslope needles other than just the course ribbon. I'd also like the ability to turn the HITS symbology on and off. HITS is great to have while shooting the approach, but I can see where it can become mentally taxing on the pilot during the enroute phase. The NASA guys tell me the velocity vector likes to jump around in turbulence. So the pilot ends up chasing it like a dog chasing its own tail. Imagine doing that for hours.
The depictions I've shown above aren't true to scale and are provided only as references for the text. They are not intended to show the exact EFIS display that is used for the experiment. I'm not a graphics artist, and it was hard enough generating these with Powerpoint. So I did not include all the detailed information shown by the airspeed, altitude, and magnetic heading tapes. You astute pilots local to the Hampton Roads area (southeast Virginia) are probably wondering what drugs I'm on because you know there are NO mountains surrounding the Wakefield airport. I only drew them in to show what the terrain depiction would look like. However, there ARE towers around the airport and I sat there dazed because I never really paid much attention to them on the sectional chart. Could have ruined my day.
How has my EFIS experience changed me? See my Chapter 22 page for my latest avionics musings.