Chapter 25: Applying the Primer
"Use high build primer to perfectly finesse the shape and surface finish."
Step 6: Applying the Primer
Step 6 involves applying several coats of high build primer over the micro and skim coats. High build primer is a thick, filler paint that contains a high content of solids. It goes on fairly thick to fill and hide minor imperfections before applying the color topcoat paint. If you've made it this far, the hard part's over. It's a joy to work with the high build primer. It mixes easily. It can be applied by spraying it on or rolling it on. (See Notes from Dennis Oelmann below.) It sands off easily.
Nat Puffer and the folks at Rutan Aircraft Factory highly recommend the use of two-part epoxy primers and paints all the way through top coat. Epoxy primers get solid by curing, not by drying. They are compatible with fiberglass (duh!) and are impervious to solvents. They also provide a good UV barrier due to the high solids content. Viking and Sterling are two products specifically called for in the plans. They were the best available primers and paints available at the time the plans were written, and they remain good products to date. In truth, you can use any high-quality automotive high build primer. It's a good idea to stick with one complete painting system -- i.e., a high build primer, sealer, and top coat made by the same manufacturer. Else, ensure that the high build primer you use is compatible with your choice of topcoat paint. Two-part epoxy primers are generally compatible with most urethane top coat paints.
Stay away from polyester fillers, like Featherfill and Eliminator! They shrink up and will start flaking off after a few years. The reports on the Polyfiber products run 50/50. Some people like the Superfill primer; some absolutely hate it. Stay away from lacquer primers. They get solid by drying, not by curing. They can turn liquid again when exposed to solvents.
I'm using Valspar VP50 Series high build primer. There's no particular reason that I chose this manufacturer over any other except that some of my friends have used it in the past with great results. VP50 is direct-to fiberglass and metal, so except for surface washing, no prep work is required to guarantee adhesion. It sprays well, flows out well, and is thick enough to cover with just two coats. It is more forgiving, too. It doesn't "flash" (turns into overspray) in warm temperatures. It's also cheaper than PPG K-series primers. The VP50 primer comes in grey, yellow, and white. I've used just the grey, but what I may do in the future is use grey for the sacrificial coats and use white for the final coats. In this manner, the grey serves as a guide coat for the white.

Process for Applying High Build Primer
1. Clean the surface impeccably before applying any primer (or any paint for that matter). The surface must be free of oils, debris, and other contaminates. The ritual is to vacuum the surface thoroughly, then wash it down with soapy water. A small amount of mild detergent mixed into a bucket of water will do. Rinse thoroughly with clean water. Let dry thoroughly. You can speed up the process by drying the surface off with a lint free towel, then let it air dry in the sun. (Don't use your air hose! Some air compressors have a nasty habit of expelling minute droplets of oil with the compressed air!) If the surface was handled by human hands or has been sitting around for a while, it's a good bet the surface is contaminated with oils and other contaminates not easily removed by soapy water. If you suspect this is the case, wipe down the surface with a commercial grease and wax remover before washing with the soapy water.
2. Give the primer a thorough stirring before beginning the session. (Just the primer! Don't mix the activator into the primer just yet.) As said above, high-build primer contains lots of solids that tend to separate out of suspension and settle to the bottom of the can. The solids can be SEVERAL inches thick! The goal is to re-incorporate the solids and get them suspended in the liquid. It takes more than a few minutes to do this. A casual stir with a mixing stick won't do! If the paint shop is close by, have them stir the can for you using their vibrating machine. If not, five minutes with an electric drill and one of those propeller-blade stirrers will do the trick. (The one I'm using is attached to my electric drill in the picture above.) I like to do this "big stir" while waiting for the surface to dry thoroughly. Once stirred, the solids will stay suspended for several hours before needing another big stir. This way, you only need to hit it with a small stir before mixing the primer and activator.
3. Get everything else ready to go. Once the primer is mixed with its activator, it has a pot life and you will be "on the clock". It must be applied before it begins to cure. This is especially important if you're spraying the stuff. The worst of all evils is to clean an expensive paint gun that is clogged up with paint. I do the following, preparatory things:
-
(If you're spraying) Plug in the air compressor and lay out the hose to the work area. Make sure the hose can reach to the farthest spot of the surface being primed.
-
(If you're rolling) Lay out the roller and tray.
-
Lay out your respirator, face shield, and ball cap.
-
Lay out the activator, reducer (if needed), indexed mixing cups, funnel screens, and mixing sticks.
-
(If you're spraying) Read the instructions and set up the paint gun's regulator pressure, fan, and richness to the recommended setting. Stand the paint gun upright, remove the cap for the reservoir, and place a funnel screen over the reservoir.
-
Have a roll of paper towels nearby.
-
Clean out the bucket and refill with fresh water. You always want to have fresh water on hand should you get paint or solvent in your eyes.
-
If you've masked off any areas, make sure the masking paper is secured everywhere and that it won't go flopping around onto your freshly sprayed primer.
4. After the surface has thoroughly dried and just before pouring the activator into the primer, wipe down the surface one last time with a high-quality tack cloth. Don't skip this step! "Lint Free" is not always lint free. It's also amazing the amount of airborne contaminants that collect in such a short period of time. You can obtain good ones at any quality automotive paint store. Make sure the tack cloth is "silicone free". Don't use the ones from Lowes and Home Depot unless you can guarantee they are silicone free.
5. When you're ready to go, it's time to mix the primer and its activator. Most high-quality primers are two-part systems that are mixed in the ratio stated on the can. (Make sure you read and follow the mixing directions!) It's usually mixed X:Y:Z, meaning you will mix X parts primer with Y part of activator. On some systems, you might add Z parts reducer to thin out the mixture for spraying. You don't need the reducer if you're going to roll on the primer.
Mixing is a snap with indexed mixing cups available from any paint store. These cups have column after column of marks all the way around the cup to match the quantity of primer, activator, and reducer to ratios of 1:1 all the way to 8:1. The Valspar I'm using is mixed 4:1:1 (four parts primer, 1 part activator, 1 part reducer). I take a Sharpie pen and place reference arrows over the columns to use. That way I don't mistake one column for another. Getting the ratios wrong will ruin your day. These mixing cup require you to fill it with primer first, then activator, then reducer if required.


Give the primer a quick stir with your electric drill and propeller stirrer. Dip a small dixie cup into the primer and gently pour the primer into the indexed cup. Don't be a fool and try to pour straight from the gallon can! All you'll do is make a mess. Try not to make any splash either! You don't want the primer to splash onto the side of the cup, especially onto the side where the indexed marks are. You'll get a false reading and you won't be able to keep track of the level in the cup. As the cup fills and the level of primer approaches the mark for the quantity you desire, slow down the pouring and stop before reaching the mark. Give the primer a few seconds to level out so you can get an accurate reading. Add smaller and smaller amounts of primer until reaching the first mark.
Grab the activator. Pour the activator slowly into the very center of the cup. As before, stop pouring before reaching the index mark to allow the surface to level out. This is especially true for thicker activators. It takes a while for thicker activators to migrate over the surface and level out. Pour in smaller and smaller amounts until the index mark is reached. If your activator is thin, you'll have better luck by pouring the activator into a dixie cup first, squeezing the dixie cup closed at the top, then pouring slowly from the dixie cup into the indexed mixing cup.
If you're going to spray on the primer, do the same thing for adding the reducer if the instructions call for it.
You can see how this works in the picture above. The 4 parts of primer is the gray liquid on the bottom of the cup, the 1 part of activator (brown) is the middle layer, and the reducer is the pale liquid on the top. I like to use more reducer than called for. Here I've put in 1.5 parts reducer.
Once all the liquids are in the mixing cup, grab a clean mixing stick and give them a good stir. But be gentle with the stirring! You do not want to fling any of the liquids out of the cup as that will throw off the ratios and affect the cure. Mix for a few minutes being careful to scrape along the bottom and sides of the cup to ensure full incorporation. Be aware that some systems require an "induction" period where you set the mixture aside for a specified amount of time before pouring it into the paint gun reservoir or rolling pan. If required, the induction period allows the chemicals to interact and do their molecular thing before being sprayed or rolled.
If you're spraying, place a funnel screen over the paint gun reservoir. (I show a screen in the pictures above.) Pour the mixed primer into the funnel and into the reservoir. If you're rolling, hold the screen over your rolling pan and pour the primer through the screen. You really should use a funnel screen to collect any larger solids that couldn't/wouldn't incorporate. These larger particles can clog up the spray gun or cause weird splotches to form on your surface. These screens are one-shot deals and shouldn't be used a second time. Most quality paint shops will give the screens away for free anyway. If you have to pay for yours, take your business to a better shop!! :-)
If you're going to roll on the primer, you can thicken the primer even more by adding microballoons up to 25% by volume. This is called micro-primer. How cute!
6. It's time to apply the primer. You want to apply two or more coats. The idea is to once again be thick enough so that when you sand, there's enough material there to sand down to the highest high spot. Use whatever method you want to, either spraying it on or rolling it on. To date, I've sprayed on all my primer. I use more than the recommended amount of reducer. This thins out the primer, makes it easier to spray, and the primer flows out nicely without orange peel. I spray along the perimeter first, then go back and coat the entire surface. I wait the recommended time for "recoating", then apply the second and third coats as needed. If you're rolling, you'll do the same thing and wait the recommended recoat time before applying the second coat. Let the primer cure the recommended time before touching it. SAFETY ALERT: Always wear a respirator and eye protection when painting to avoid the inhalation of dangerous fumes.
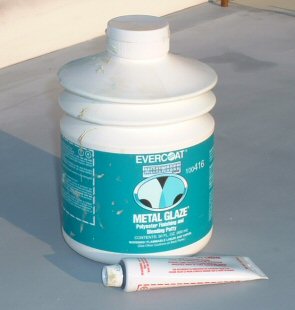
7. You might find some pinholes depending on how well you did the skim coating. If you didn't skim coat, you're liable to find MANY pinholes! Find and fill them now using a two-part glazing compound. I use EverCoat Ice. I mix the stuff up and stuff it into the pinholes with a spatula or small putty knife. The two-part compound cures completely and is ready for sanding within 10 minutes. I was told by professionals not to use the stuff in a tube. It is one-part and might not cure completely when applied to tiny holes. The following pictures are of the port strake. I did get a few pinholes even after skim coating. However, these occurred only in the areas where I sanded through the West and into the micro. I use little strips of tape to mark each pinhole. Then I fill the area with Ice. Since this was the sacrificial coat of primer, I made no real attempt to scrape off the excess glazing compound. It came off quite easily when I sanded the primer.
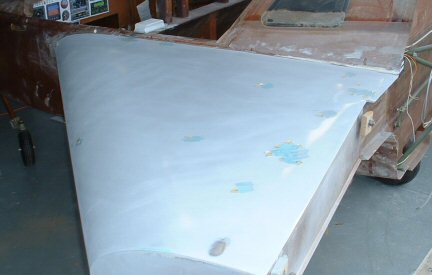

8. After the primer has cured completely, start sanding. The first coats are sacrificial and you end up sanding most of it off. The process is just like contouring, but to a much smaller scale. We're talking mils here (thousandths of inches). The sanding is done with the same 45-degree, criss-crossing pattern as before. Use anything from 120 to 220 grit. Sand down until the primer is ALMOST removed from the high spots. The primer will become translucent and you will see the micro beginning to appear through. Stop when you are about to hit the high spots. Here, it is very easy to see where the surface is too low because the primer will still be shiny over the low spots. Unlike micro, it is okay to fix low spots by respraying the low spot or rolling on some micro-primer. Let those areas cure, then re-sand and feather in with the surrounding areas. Here are pictures of the wing and the winglet. Notice all the white splotches? This is what you're looking for. They're still covered in primer, but the primer is so thin that it has become extremely translucent. It might look like I sanded the winglet down a little too far. But the "bare spots" are still covered by the West skim coat and they do have some primer over them.


9. This is going to sound like a broken record. You might find some pinholes, especially pinholes that were originally bridged and have now opened up. Fill them every chance you get with that two-part epoxy glazing compound.
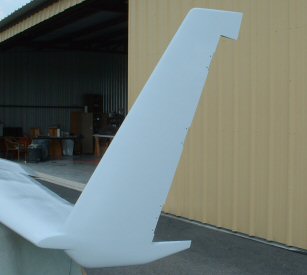
10. The second round of primer is normally the "final primer". The final primer should cover the surface completely and be one uniform color. None of the sacrificial primer should show through and by all means, no micro or raw fiberglass should be exposed either. If you're going straight to final painting, then you'll wet sand these coats with anything from 320-400 grit. (Use the grit specified by the prep instructions on your top coat paint.) Don't do any sanding if it's going to be awhile before you paint the piece. That way the primer will protect the piece from curious hands (oil), dust, and other airborne contaminants. Sanding the final primer is more art than science. The sanding pattern is the now all-too-familiar 45-degree, criss-crossing pattern, except this time you will wet-sand the primer. You will find it easier to use shorter sanding boards. Remember to change out the wet sand paper often. You'll wet-sand the final primer until all of it is sanded dull. You should not have any low spots, scratches, or dings. You'll know when you're getting close because the primer will start to "run slick". It'll feel like the sanding board is gliding over a slick surface. The sandpaper will feel like it's not grabbing (cutting) any more. You can use the squeegee technique to check your progress along the way. Pour some water over the surface and squeegee it off with a rubber window squeegee. If the surface is true and flat, no water will be left behind. However, low spots, pits, or gouges will be instantly revealed by the water left behind. You'll sand with more attention paid to the areas that surround the low spots. But don't go crazy with this! We're talking about only a few mils here. The final primer is very thin and you can inadvertently sand through it if you're not careful. Here are some examples of the finished products.

11. This is going to sound like a broken record. You might find some pinholes. Here's your very last chance to find and fill every one of them before the top coat paint is applied. You can also use the glazing compound to fill/fix scratches or other imperfections that the primer didn't fix. Apply the glazing compound and immediately scrape off the excess. Wet sand the spots after cure. No kidding, this really is your last chance. Unlike high build primer, the top coat paint is very, very thin and will expose every imperfection in the surface finish.
After this, the only step left to do is apply the colored, top coat paint.
Some Notes from Dennis Oelmann
(These are excerpts from an email that Dennis sent to the Cozy Builders Group in August 2005. Dennis has achieved great results at rolling on the high build primer in lieu of spraying it.)
Specialty Products Company makes
a high build primer used for fiberglass that is applied with a roller instead
of a spray gun. The primer, roller and paint tray are available at your local PPG
paint dealer. I have also tried rolling on the K-36 high build primer with
very good results. Even though the PPG paint representative looked at me kind
of funny when I told him that.
The paint trays are disposable and are less than 2 bucks each. The handle
and box of foam rollers around 12 bucks. I think their is 8 in a box. They
come in two sizes and I like the larger ones with a finer nap. The rollers are
only about 2 1/2 inches long. You can prime the top of a strake in 15 minutes
and cleanup is 15 seconds. What is really nice about priming with a roller is
you can start at one end and by the time your done you can start over again or
just add where you need it. Clean up is EZ Just wrap a plastic bag around the
foam roller and pull it off and dispose of it in the trash. I really like this
system because you can get your project ready for top coat and never have to
buy a paint gun or an air compressor. You will have a slight orange peel look
after priming but hey, ya gotta sand it anyway..
This is how I did it. Guys, you can roll this stuff on over a part that
has been contoured with West System sanded with 36 grit then polished with
80. Then shell coat the part with pure epoxy and allowed to dry for 3 days."
Don't skip the 3 day part or you will be sorry" It has to be dry because the
primer seals in the epoxy and forms a barrier. The solvents have to breath out
so don't think about priming till you know it is DRY. I know this because I
learned the hard way! When you roll on the primer you will be able to see the
pin holes that you missed and deep scratched that need more primer or fill. I
use a product called Icing. It's a high quality body filler that you have to
add hardener too. I only fill pin holes or scratches with this stuff but it is
easy to see the imperfections the next morning after you primed it. I filled
those imperfections right on top of the primer and then sanded it down with
320. Reprimed and sanded with 400. Now you're ready for the top coat.
Oh, Your probably thinking how do you sand it without air powered tools?
I have found that the best contouring is done by hand with a hand file board.
The surfacing or filling the scratches and pin holes with power tools then
hand blocked the final coat of primer. Dewalt makes a variable speed DA (dual
action) sander. I got mine at Lowes for $109.00 dollars. It has a Velcro 5 in.
hook pad. I found the "Hook It" 6" sandpaper at the PPG dealer that had the
fuzzy side on the paper in 320 grit. The extra overhang on the sandpaper
really makes surfacing the inside of all those radius' a lot easier. Just keep
the sander moving or you'll dig a hole.