Chapter 25: Seam Treatments
If you've seen Steve Beerts' Long-EZ, you'll understand why his plane is a reserve grand champion. Many things catch your eye, but the one that stood out the most for me were the seams. They are perfect and even, a great testimony to Steve's workmanship.
The Seam Process
There are many seams on the Cozy IV. On the fuselage, this means every door, hatch, cover, and canopy. I decided beforehand which side of the seam would be the "reference edge". This is important because later I'd be running a blade back and forth to form the seam. The reference edge needs to be exactly straight or perfectly curved so that I could form the other edge as its mirror image. If the reference edge is wiggly to start with, then the opposite edge would end up wiggly, too.
So before spreading the dry micro, I took the time to true up all the reference edges:
(1) All canopy edges
(2) Forward and side edges of removable forward deck. (Note: I reversed the joggle there. The forward edge of the deck overlaps over the rear edge of the canard cover.)
(3) Forward edge of the canard cover.
(4) Edges around the nose hatch.
(5) Edges around the ballast door.
(6) Forward and aft edges of the main gear cover.
(7) Edges around the speed brake panel.
(8) Nose gear doors.
(9) Strut Cover (although that is really about having a gap opened to a certain width)
(10) Aft edge of fuselage where it overlaps the top and bottom cowls.
Before spreading any micro (pre-fill or Big Fill), I applied box sealant tape between the components, with the sticky side of the tape being stuck to the reference edge. I then went about spreading the dry micro ad nauseum. I then spent time contouring all the surfaces. Once all THAT is done, only then did I address the seams. :-)
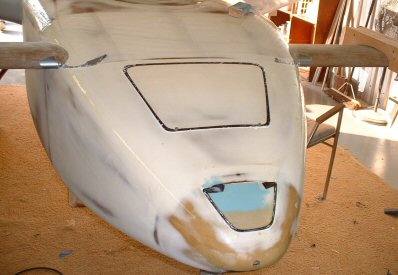
Here's the process I'm using. I use the nose door and the nose top as examples.

After many hours completing the contouring, I carefully pulled the components apart and dressed up the reference edges again with an 80 grit sanding block. It always happens that some micro gets between the release tape and the reference edge. I reinstalled the component to start opening up the seams. My tool of choice depends on which seam I'm working on. If it's a large seam -- like what is needed around the edges of the canopy and canard cover -- then I use a fine textured Perma-grit blade. I've been told you don't want these seams to be too narrow to start with. The primer and the paint will add thickness to the components. If the seam is too narrow to begin with, the primer and paint will close up the seam. Repeated opening and closing of the canopy, as well as in-flight flexing of the canard, will eventually cause the top coat paint to chip off or rub off around the edges. I've been told the seams should be as wide as a mixing stick. The Perma-grit blade is a little bit thinner than a mixing stick. However, my hangarmate used it on his Long-EZ without problems. So I think I'll give that a try. In addition to the canopy and canard cover, these seams are appropriate for the speed brake panel, nose gear doors, nose strut cover, and possibly the nose hatch cover.
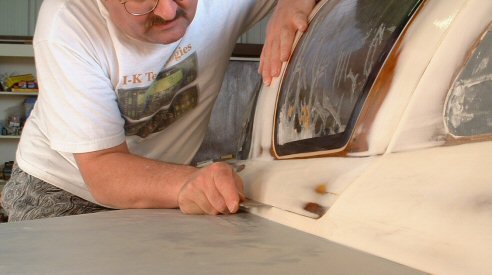
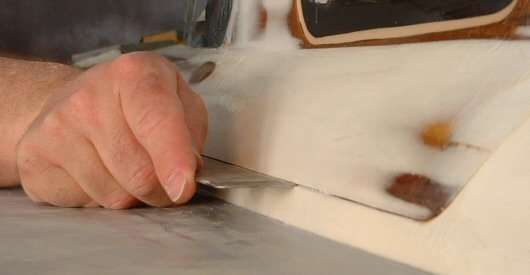
Where I desire a thinner seam, I'm using a hacksaw blade. I drag the last few teeth on the end of the blade along the reference edge. These thin seams are more appropriate for components that are installed once (like the side edges of the removable forward deck), or are not used very much (like the main gear cover).
I start the wider seams by first scoring the seam with the hacksaw blade. Then I switch over to the perma-grit blade. I use only the corner of the blade initially until I've widened the seam some. The wider the seam becomes, the more of the blade (up to about 1/3rd the length) I can use to file open the seam. I go about this very carefully. Eventually the blade will reach the fiberglass in the bottom of the seam. You may end up with some micro remnants. These can be removed with a razor blade or a piece of sandpaper. The last step is use some 220 grit sandpaper and make a small round on all edges. Paint will not stick to sharp edges. So a small round-over is needed. But don't over-do it! You don't want to ruin the precision of the seams.

You may find that you opened your seams too wide. Here's the process for fixing them. You can also use this process to create the right-sized seams.

What you essentially do is wrap the edge with tape to the desired thickness for the seam. I like to use electrical tape because it stretches. And it adheres tenaciously and won't let go of the part while the micro is curing. Next, install the part on the plane and fill the seam with micro. I like to use a wetter micro since a wetter micro is more easily coerced into smaller seams without bridging. The wetter micro also cures harder (more epoxy in it) and is less likely to chip. After cure, you follow the same process with the perma-grit blade or the hacksaw blade to true up the seams. Here are pictures of this process. I decided to go with a thinner seam for the nose hatch cover. So I'm in the "repair" process for that one. I'm using a thin seam for the ballast compartment door. So I'm using the tape to create the thin seam on that one. My ballast compartment won't be used that much since it's already crowded with a headlight and pitot tube plumbing. I won't really be using it for ballast. The cover won't be taken off much. So it gets a small seam.