Chapter 25: Sanding to Contour
"Contouring is Shaping."
Step 4: Sanding to Contour
Here it is, folks. Contouring is not sanding. Contouring is shaping! Let's take the winglets. They are perfect examples of what is meant by shaping to contour. Remember when we hotwired the winglets? We started with perfectly shaped airfoils, right? After glassing them with 2 UNI, we still had relatively well-shaped airfoils. But what happened after we applied those 9-ply inside and outside layups to attach the winglets to the wings? We created a huge hump in the lower one-third of the winglet. Our perfectly shaped airfoils were no more!

Okay, fast forward to Chapter 25. If all we did was cover the winglets with micro and sand it smooth to a uniform thickness, all we did was make the humps 1/8th inch thicker and the winglet 1/4th inch wider. We did nothing to restore the winglet back to its original airfoil shape. But, if we plop on enough micro and use the correct sanding pattern, we can reshape the micro into a nice airfoil no matter what the shape of the fiberglass surface is underneath.
Contouring Boards
Ever notice how a job goes easier when you have the proper tools? Well, here's one of those times. Good quality contouring boards are a MUST for achieving a good finish. As George says in his article, trying to sand with a chunk of triple-folded sandpaper pushed along with your bare hand is not going to work too well. George makes his own from white shelving material with C channels screwed on to them to hold them straight. He uses a 32-inch board for sanding the wings and a 16-inch board for sanding other smaller, flat areas. He also has two flexible boards made from thin plywood to sand compound-curved surfaces. He glues the sandpaper onto the boards with adhesive spray. The Chapter 25 plans specifies a 22-inch board, which is affectionately dubbed "the Board of Pain" by the canard community. :-)
After 10 hours of using the home-made stuff, I decided to invest in some professional-grade contouring equipment used by the marine and auto body industries. The 3M Hook-it Marine fairing boards are the cat's meow. "Hook-it" implies that the board and the sandpaper have velcro hook-n-loop on them. The board has the hooks; the sandpaper has the loops. To change grits, you simply peel off one sheet and press on another! I have one 30-inch rigid board and one 30-inch flexible board. The sandpaper is expensive, but it is top quality! WOW, what a difference! It cuts much better and lasts longer than the other generic sandpaper I was using. Plus, you just can't beat the convenience when it comes to changing out the paper. (Addendum: The sheets come 10 to a pack for about $30. I've finished the contour sanding on my plane and I didn't use all 10 sheets. :-) )


I also love my Durablocks. They come as a set in all shapes and sizes, rigid and flexible. They are used with "blocking paper", which is a fancy name for sticky-backed sandpaper sized to fit onto sanding blocks. (Hence the name "blocking paper". Clever, huh?) The blocking paper is available on rolls in all grits from 50 to 2000. To use it, you simply roll out the length you need, press the blocking board on top of it, and cut it off with scissors. When it wears out, it peels off in one piece without a fuss. I also use a 30-inch, square aluminum tube to "true up" the surface and ensure I'm getting an absolute, flat finish. Finally, my last contouring "tool" is two 3M scuff pads and a piece of blocking paper. By holding the pads in the palm of your hand, the pads allow you to shape rounded edges to perfection. I used the pads to shape the wingtips and the end caps at the tops of the winglets.

I try to do all my sanding outside to keep the dust out of the hangar. (A losing battle if ever there was one.) The air hose is incredibly handy for clearing the micro debris from the grains in the sandpaper, and for blowing the dust off the surface being contoured. It is also handy for blowing the grit away from my eyes, face, and clothes. Yes! I wear a high-quality particle respirator at all times, even when the wind is blowing! The dust goes everywhere and likes to cling to sweaty skin. It's very irritating when it goes into your eyes, too. I found it helpful to place a powerful fan behind me to propel the dust away.
Sanding Technique
The most important part of contouring is to use the proper sanding pattern, which is most always a series of alternating, 45-degree passes. Please, DO NOT do the wax-on, wax-off thing. DO NOT do the "paint-the-fence" thing (side-to-side or the up-and-down) either!
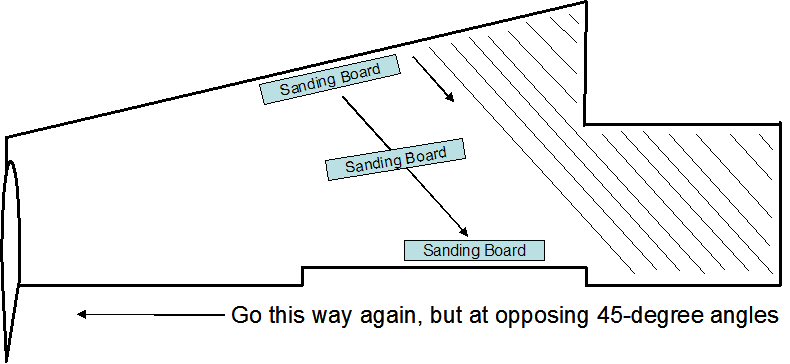
For airfoil shapes, the sanding motions are made at 45 degrees to the span of the wing. Start at one end of the wing. Sand at 45 degree angles to the span using the longest reasonable stroke. Try to reach across the whole chord if possible. Move slowly to the other end by moving the board over an inch or two with each stroke. When you get to the other end, go back and start another pass, this time sanding at 45 degrees the other way - i.e., 90 degrees to the first pass. After these two passes, move around to the trailing edge side of the wing. Make two passes from there, using the same alternating 45-degree pattern. It is this alternating sanding pattern that levels out the highs and lows into that awesome, wave-free finish.
Note that only the sanding strokes are at 45-degree angles. The sanding board itself is always oriented parallel to the span of the wing. It is never held at a 45-degree angle. Because the leading edges of our wings are not parallel to the trailing edge, the sanding board has to be rotated slightly during the stroke for it to stay parallel to the span. Start each stroke with the sanding board parallel to the leading edge. As the stroke crosses the spar caps, the board should become parallel to the spar caps. The board should be parallel to the trailing edge by the time you finish the stroke. Same thing on the return stroke. The one exception is when working the ends of the wings outboard of the ailerons. Our wings have twist built into them. The orientation of the board must be changed a bit to remain flat against the wing's surface in those areas. That will become obvious when you do this for yourself.

These sanding cycles are repeated over and over until the surface has been sanded to contour. Start with 36 grit. The sanding will go hard at first because almost all the effort is spent sanding off the peaks, ridges, and high spots on the micro surface. With perseverance and strict adherence to the sanding pattern, you will get down to a uniform surface. When that happens, all of the sandpaper will be working for you and the sanding will go much quicker. (An alternative is to use the cheese grating technique, as the contour sanding goes much easier when the micro is greening.)
After each pass, check the surface for high and low areas. The best way to check for this is to use you hand and slide it over the surface in long sweeps in all different directions! Your hand is amazingly sensitive and it will be able to detect even the most minute surface variations. Your hand will catch what the eye cannot see. Direct more sanding to the high areas and pass quicker over the low ones. The goal is to level out the dry micro and bring the entire surface into rough contour well before hitting any high spots.
Keep sanding with 36 grit. As the micro becomes thinner and thinner, it will start to become more and more translucent. Eventually, it will be translucent enough to see the fiberglass weave beginning to appear from under the micro. This always occurs over the high spots first! Keep your eyes and your attention on these high spots, for you are keying on the high spots to know when to stop sanding!
Switch to 80 grit when the high spots first start to appear under the micro. The 80 grit removes the deep scratches left by the 36 grit and allows more control over how much micro is removed. Keep sanding with 80 grit until the high spots are clearly visible under the micro. STOP SANDING when you are ABOUT to hit the high spots. You want to leave a thin layer of dry micro in place. You do NOT want to expose the raw fiberglass surface. So, STOP SANDING just BEFORE exposing the high spots. This is easier said than done.
If everything goes well and you've remained faithful to the sanding pattern, you will achieve a good, straight, level surface before any micro is removed from the high spots. Just be aware that the 80 grit will go quicker than you think. So keep an eye on those high spots. It takes only a few passes with the 80 grit to uncover a high spot. It's VERY TEMPTING to keep sanding until the high spots are actually exposed. Don't do that! Once a high spot is exposed, any additional sanding will only re-introduce waves in and around the high spot. Plus, you run the risk of sanding into the fiberglass and potentially destroying the structure! It takes experience to know when to switch grits and to know when to stop sanding altogether. Be patient. Just remember that contouring is shaping! Not sanding! You don't want to contour the surface any lower than the highest high spot!
George goes all the way up to 100 grit for final contour. (I went up to 120 grit early on.) I did that for a while before learning more about the raw epoxy finishing technique, which is skim coating with raw epoxy. Skim coating covers and fills so well that I feel there's really no need to sand the micro past 80 grit. So now, I use 36 grit to quickly get the micro into rough contour. I switch to 80 grit to finesse the contour. Heck, I used only 36 grit on the fuselage! However, in all cases, I did stop just before hitting the high spots. Again, if you can time it right when the micro is greening, the cheese grating technique saves a lot of time and muscle!
Lessons Learned
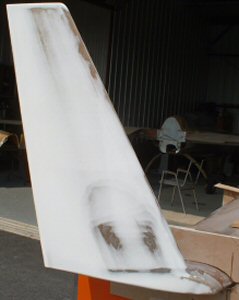
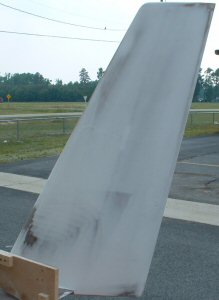
When I was first starting out, another one of my mistakes was sanding too far down into the micro with 36 grit before switching to 80 grit. Thus, there wasn't enough micro left to finesse the contour with 80 grit before exposing the high spots. You can see the high spots in the picture on the left. Like a dummy, I didn't stop. I continued to sand, hoping for a good contour. I only made things worse. All I got were depressions all around the high spots. I eventually re-micro'd and re-contoured that side of the winglet. I paid more attention when I contoured the inside of that same winglet. Notice that almost all of the surface is still covered with micro. I still did manage to expose those two high spots at the leading edge of the winglet, although they got covered adequately with high build primer. (Please note that these pictures were taken BEFORE deciding to go back and install the lower winglets.)
Feathering Technique
Occasionally there will be times when you will be filling and contouring a new area that's adjacent to an already-contoured area. You'll need to use a feathering technique to blend the new contour into the existing contour. For that, I use duct tape so that the new micro cures with an edge to it. Later, I use duct tape as a guide to keep from sanding into the existing micro and disturbing its contour.
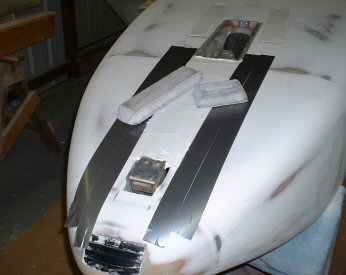
I used this technique for contouring the nose strut cover. The bottom of the nose was already contoured, but the strut cover was not. Knowing I wanted to blend the micro on the strut to the micro on the nose bottom, I applied a strip of duct tape onto the existing micro about an inch or two away from the actual edges of the cover. Then I spread some dry micro over the strut cover overlapping onto the existing, contoured micro. Once the spreading was completed, I pulled up the duct tapes so the micro could cure with a sharp edge. I find it easier to feather in a well-defined edge than feathering an irregular edge. After cure, I reapplied the duct tapes along the cured edges and added additional strips outboard of the edges. This is the real reason for curing the micro with a well-defined edge, so that you can reapply the duct tape for scuff protection! Now, start contouring until the new micro is level with the duct tapes. Remove the duct tapes and carefully feather the edges into the existing, contoured micro. Yes, the duct tapes do get scuffed up, so I change them out as the contouring progresses.
In the picture on the left, you can see how the duct tapes were placed a few inches outboard of the strut cover. The picture on the right shows the cover after contouring and feathering.