Chapter 21: Installing the Bottom Skins
Fit-Checking
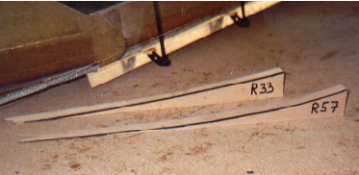
I looked at using that long tapered pine strip as called for in the plans. It worked okay to hold the leading edges into place, but I noticed a definite sagging of the bottom skins away from the ribs aft of the leading edges. So I trashed the tapered pine strip and used the R33 and R57 templates to make two cradles to slide between the table and the bottom skin foam. These cradles worked great to help shape and hold the bottom skin against the ribs. I used aluminum angles and mini-clamps to hold the foam leading edges to the TLE and BLE bulkheads. I also had the dental floss strung between the wing and fuselage to ensure everything stayed aligned to the 17.4-inch waterline.
Floxing the Bottom Skins into Place
The process outlined below differs from what's in the plans, and it is not in the same order as presented in the plans. But again, remembering that I don't like herding cats, I think it's an easier process. My jig tables are the key to my method of madness. They are set up on blocks and have lag screws on the legs to allow fine adjustment of the table height. They are NOT bondoed to the fuselage.
-
So after all the ribs and bulkheads were installed and cured, I marked their locations onto the bottom skin. I lowered the table by screwing in the lag screws about 8 turns each screw, then removing the blocks from under the legs. That gave me about 2 inches of space between the bottom strake skin and the ribs/bulkheads/spar. I pulled the bottom skin from the table and scored it along the leading edge per plans. I did add a 7th scored line to help with curving the leading edge onto the ribs.
-
I prep-sanded the entire bottom, then used a sandwich bag as a cake icing dispenser to stack up some wet flox at the ribs/bulkhead/spar contact points. I let that set up while I made a ton of wet, 1-BID tapes. (Steve Volovsek, thanx for the unexpected visit and the much-appreciated help! Your timing was perfect. Please drop by for mixing cups ANYTIME!)
-
I slid the bottom foam, flox and all, back into position on the table. I raised the table and set the blocks into place. I then screwed out the lag screws to raise the table into contact with the spar and to level the table.
-
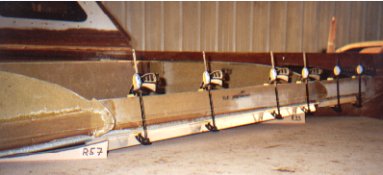
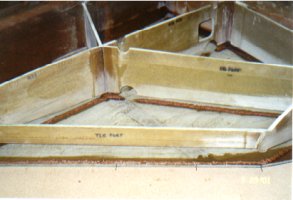
I positioned the little R33 and R57 cradles under their respective ribs, then secured the leading edges with the angles and clamps.
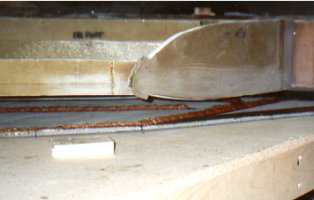
Wow, you should have seen the great flox squeeze I got. It worked like a charm! These are pictures just before raising the jig table for the big squeeze!
BID Taping
I taped the bottom skins to the ribs and bulkheads using 1-BID tapes as per plans. Maybe I'm just slow and meticulous, but it took me 4 hours to do all the taping. 8 hours total for the session. I was VERY HAPPY with how this process worked. Here's what I did to protect against pin-holes and potential leaks around the perimeter of the fuel bays:
-
I scraped away the excess flox.
-
I applied a generous coat of epoxy onto the sides of the ribs and bulkheads, and onto the bottom skins.
-
I applied a generous, wet flox fillet at the junctions of the ribs, bulkheads, and bottom skins.
-
I used wetter-than-normal BID tapes, and I overlapped the tapes onto each other in the corners.
-
Prior to applying the tapes, I dabbed drops of raw epoxy onto the flox fillets, and then again onto the centerline of the BID tapes.
-
I lightly painted more epoxy onto the outside surfaces of the BID tapes, then peel-plied.
-
After cure I inspected all junctions as much as humanly possible to ensure no existence of pin holes. :-)
Two Last Notes
When I was installing the first bottom skin (the starboard skin), I first applied a heavy coat of epoxy over the bottom skin surface for those areas that would form the fuel bays. I thought this was a good idea, but the epoxy started curing about mid-way through the taping. No biggie, but I had to be very careful about setting the tapes in place. Once they touched, they were stuck! So I changed my mind on the port skin and applied the heavy coat of epoxy in each bay after taping and before peel plying. This also works better if you have to unexpectedly quit. You can always come back tomorrow and epoxy another bay, but it is HELL to prep-sand a thick layer of cured epoxy.
If I were to do strakes again, I would go through the pain and misery of peel-plying the bottom skin areas in the fuel bays after each coat of epoxy. What happens is that when you coat the fuel bays with raw epoxy, the epoxy wants to flow to a lower place, leaving some areas well-covered and other areas lightly covered if at all. Also, surface imperfections and irregularities cause the epoxy to naturally flow away and migrate into circles called "fisheyes", again leaving some areas covered/not covered. (See archives for technical reasons why.) Peel-plying takes time, but so does waiting every 30 minutes and re-brushing and/or re-squeegeeing epoxy to maintain coverage.