Chapter 19: Mating the Wings to the Main Spar
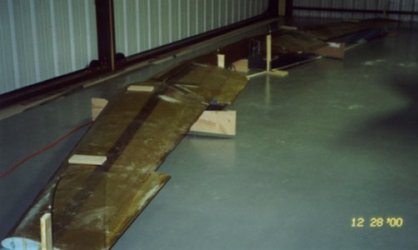

Right up front, I'll tell you that I wanted to do this entire thing different and more extensively than plans. I decided a long time ago to be a little more precise here. Being a tiny bit off on the wing bolts can translate into being alot off at the wing tips. As it turns out, I mostly followed the plans anyway. What I did do differently was to lay out both wings and the spar on the hangar floor, then jig and drill everything together as a complete unit (instead of the plans method of jigging and drilling one wing at a time to the spar, then drilling the other). It is quite a wonderful sight to see the wings stretched out in "flying formation".
Helpful Hints and Suggestions!
Before starting, I searched the archives, asked some questions, and came up with these tips and suggestions:
-
Ideally, you want the pilot holes to be drilled through the center of each hardpoint. But due to tolerance buildups and slight measurement errors, you may not be centered in the hardpoint. It will ruin your day if you drift too low and break out of any of the aluminum laminates, especially LWA5. So start off with a 1/8th-inch pilot hole. Once through, take a look into the wing pocket with a mirror and see how centered you are on the inside plate (LWA4). You should be as near center as possible. This is critical for getting a socket on the bolt head later. If you are too high or low, you can drill another 1/8 hole in the desired position. Drill up to 1/4th-inch, then use a commercial counterbore (holesaw). The counterbore will remove the first pilot hole.
-
Consensus is that the plans-recommended spot face tool is not adequate for the job. It takes a loooong time, gets very hot, and dulls quickly. In addition, the excess heat can damage the structure. Many suggest using a hole boring tool such as the Morse #TAIO-5/8" high speed hole saw. Others have used the Grainger bi-metal hole saw. Either file or carefully bend the outer teeth inward until the hole saw cuts the exact diameter hole that you need. Some builders use the holesaw as is, then make their own custom-fit bushings to match the holesaw.
-
Some builders have had great success by using a jig to ensure that the pilot holes were drilled straight and without wobble.
-
Use the wing jigs to align the wings. Drill and install lag bolts near the front and aft corners of the jigs. You can screw the lag bolts in or out to adjust the height of the wings and fine-tune the alignment until it's just right!
-
Draw the 17.4-inch reference lines onto the wing roots and tips and use water levels to set all the reference lines to the same water height. Use the Smart Tool digital level to zero in the incidence. Keep in mind that most hangar floors are poured with a slope to assure water run-off. Unless you can confirm your floor as level, use water levels!
-
Use nylon bolts or waxed hardware bolts to hold the bushing in place while the flox cures. This will ensure that the bushings stay aligned to each other. Resist trying to use your actual AN wing bolts because it is a pain to keep screwing the AN nuts on and off.
Initial Set-up
-
Before I did anything else, I cleared and swept the hangar floor :-). The owner of the hangar was very happy about that! You'll spend the next few hours on your hands and knees, so the cleaner the floor the better!
-
I used the tip and root templates to double-check the 17.4-inch water marks on the wings. I reviewed Chapters 14 and 19 to confirm the locations of the pilot holes. I re-marked the centerlines and made sure the distances between the inner and outer pilot holes were exactly the same on the spar and on the wings.
-
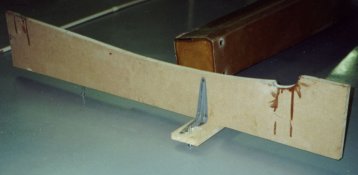
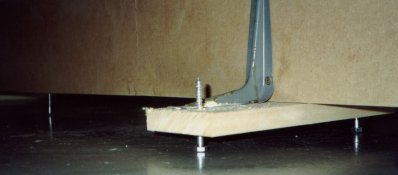
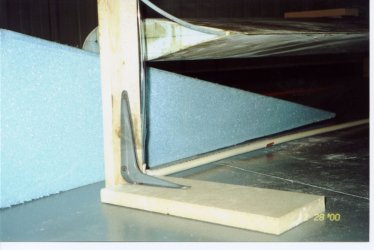
To jig the wings, I used the #4 wing jigs and two "tip jigs", which were just blue foam wedges left over from the wing cores. I tried bondoing the #4 jigs to the underside of the wings, but any sideways movement breaks the bonds and the jigs fall off. So I modified my #4 wing jigs with foot-pads and L-brackets to keep them upright. I drilled two holes in the foot-pads and one hole in the aft bottom edge of the jigs and installed three lag bolts. With the wings bondoed onto the jigs, I can screw the bolts in or out to perfectly set the height of the 17.4-inch water marks and to set the incidences to zero.
-
I supported the spar on four jigs with lag bolts to set the spar's height and incidence relative to the wings.

-
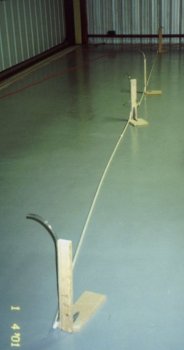
I used a water level to set all the 17.4-inch water reference lines to the same water height. I constructed the water level from 30-feet of half-inch PVC pipe. I installed elbows at the wingtips and T-couplers at the wing roots, then used some clear plastic tubing at the elbows and couplers to serve as vertical standpipes for dialing in the wing heights. Took less than $20 and 30 minutes to construct the water level. Again, if you've never used water levels before, due to Mother Nature, water in a tube will seek it's own level. So if you fill clear plastic tubing with water and you suspend the ends, the water bubble at one end is exactly level with the water mark at the other end.
-
Jigging the wings and spar was like herding cats. What I found worked most expeditiously was to set the tip height to the water level, set the root height, then adjust the incidence to zero. Changing incidence changes the root height somewhat, but it's easily adjusted with the lag bolts. Once I got the wings aligned, I aligned the spar to the wings using their jigs.

Drilling the Wing Bolt Holes
-
I studied the hardpoint orientations to get a firm understanding of "well if I drill a pilot hole here, where will it come out there?" When ready, I used a block of wing foam and elevated one end of the spar so that the end I was drilling on was flat on the ground. I heeded Ken Miller's advice and used a 1/8th-inch drill bit and drilled the pilot holes through the spar hardpoints. It saved me because I was one bit's width off on one laminate; the other 5 were on center.
-
I used my really long drill bit to open up the holes to quarter inch. The longer the bit, the more control you have of holding the bit exactly vertical. This is crucial for drilling straight and centered through the laminates.
-
Instead of flipping the spar forward face up to drill the holes in the front face, I simply continued drilling from the backside, making sure to hold the drill exactly vertical. I then set the spar to the wings. After checking and rechecking the alignment one final time, I bondoed the spar to the wings.
-
With a leap of faith, I drilled the quarter-inch pilot holes into the wing attach points. I was pleasantly surprised that all the pilot holes got drilled onto the centerlines of the laminates. What a relief.
-
I used a hole-saw to drill out the wing-bolt holes. Wow, what a laborious job! I found the easiest way to re-size the hole-saw for perfect fit is to grind the outside teeth down with a dremel tool. I tried to bend the teeth, but broke them instead. I tried to file them, but the teeth were too tough. I kept checking the diameter by drilling holes into a quarter-inch sheet of aluminum and using a bushing for fit-checks. Don't use wood for this as you will get a false reading. I used one holesaw for the entire job, but if I were to do this again, I'd buy a second holesaw and use one for each wing.
-
After I drilled the holes, I found out that they ended up just ever-so-slightly undersized. The bushing would have to be forced in. But guess what? Did you know that the coarse sanding drum on a dremel tool is EXACTLY 5/8th-inches? So I merely "honed and polished" out each hole until I got a near machined fit for the bushings.
-
I cut all the bushings to the correct hole lengths, put them in the wing holes, then used half-inch hardware bolts and nuts to attach the spar to the wings for a fit-check. Without washer correction, my incidence between wings is only off by less than 0.1 degree, so I disassembled everything, floxed the bushings in place, waxed the bolts and nuts for release, then reassembled the spar and wings. I reset the 17.4-inch water marks and reset the incidence on the starboard wing, and put everything under a heat tent to wait for cure.