Chapter 18: Installing the Rear Windows
Step 5: Installing the Rear Windows
I didn’t perform this step in the order listed in the plans. I waited to install the windows until near the end. I don't remember exactly why I waited? Maybe to minimize chances of dinging the windows?
STOP!! Don’t cut out the openings until you have the windows in hand. My rear windows are inexplicably shorter than required to cover the plans dimensions for the window openings. I had less than a ¼-inch overlap in some places! (The plans call for ¾ -inch overlap all the way around the windows.) So I ended up sizing the openings to fit my windows.
I drew the window outlines onto masking tape to minimize making marks all over the turtleback. I kept fit-checking the windows and kept moving the outlines until I got a window opening size that left me with at least a half-inch overlap. I used the bottom of a mixing cup to form the radii for the corners of the windows. I guess my windows won’t be officially plans-built since I didn’t use the plans-required mayonnaise jar lid??? (Ha, ha, that’s intended to be a joke J) Only after a careful fitcheck did I commit to cutting out the openings.
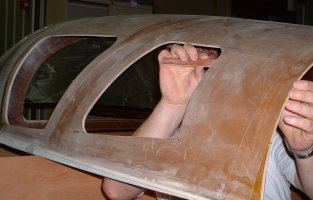
I used emery boards to form the grooves into the window openings. They worked well and there’s no chance to gouge the inner and outer skins like a dremel tool would. I followed the plans and removed a section of inside skin across the large openings, temporarily installed the windows, and marked out the window outlines. I taped off the windows, trimmed to dimensions where needed, and rounded the corners.
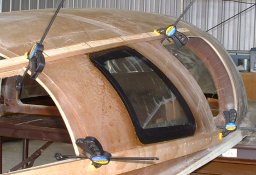
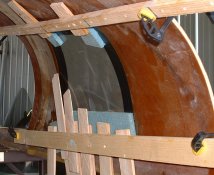
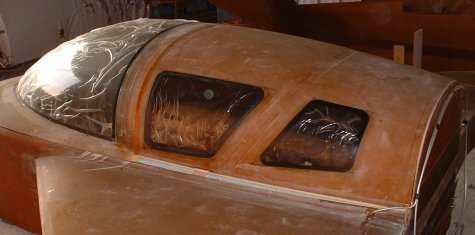
I followed the plans method for floxing the windows in place. I have to admit it worked pretty good. The plans say to use clecos and washers to hold the windows against the outside edge. But that's only for the widest edge of the window. I found that I had to rig up the gizmo shown here to hold the other three window edges against the outside skins. The skins are very flexible and the flox globs want to push the outer skins away, leaving a flox-filled gap that will be cosmetically challenged once cured. So I used two lattices from the T-back jig and used shims and foam pads on the inside to hold the windows against the outside skins. This gizmo is ugly, but it was quick and effective. I stayed around the hangar for a few hours after the windows were installed. The wet flox likes to seep out and run onto the windows. So I periodically would scrape away the ooze and wipe the seam clean with a paper towel. After cure, I tried to reinstall the skins across the wide openings. But it was not worth the time. So I pour-foamed the gaps and put 2-UND over that. I made a paper template first and trimmed the UND to the exact window shape before applying and peel-plying.