Chapter 18: Nose and Canard Cover
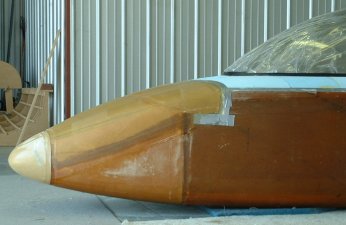
Again, this is really Chapter 13 and 24 stuff, but I'll record it here since I did the entire top at one time. I glassed the nose and canard cover first, then removed them to gain access to the inside of the fuselage to release the drywall screws holding the forward deck foam into place.

Fabricating the Nose Door
I fabricated the nose door differently than plans. I didn't like the idea of making the door first, then carving a recess into the nose before glassing the entire nose. My process sounds more involved, but it's actually simpler and there's less margin for error. Here's what I did:
- I first glassed the entire nose top and canard cover with 2-BID per the plans. I cut away the nose top as per plans. I used a template to ensure the line between the canard cover and nose top was cut out symmetrically.
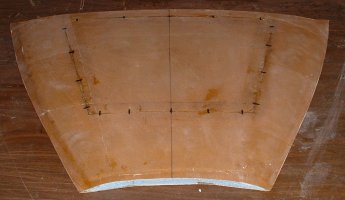
- I drew the outline for the door onto the nose top, then used my dremel tool to cut through the nose skin along the outline. But I didn't cut it out all the way. I'd cut for a bit, skip 1/8th inch, then cut for a bit, skip an 1/8th, and so forth. In this manner, the door stays temporarily attached to the nose top during the remaining layups. Thus, its shape is guaranteed to fit the rest of the nose! You can't really see the cuts in the pictures below, but you can hopefully see the nose door outline, as well as the small tick marks that show where I made the serrations by skipping the 1/8th inch segments. By the way, I didn't like having the aft edge of the door secured only by the canard cover, so I'm making a joggle for the aft edge of the door.
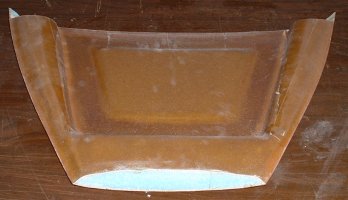
- I flipped the nose door upside down and removed the foam down to bare glass around the inside perimeter of the door outline, one inch to each side of the cut lines. (Two inches total width removed.) Unlike the plans I shaved down the foam over the inside of the door, leaving about 1/4th inch for stiffness. I carved and shaped the rest of the inside surfaces as per plans, slurried the foam, and glassed the inside surfaces with 2 BID. (I used 2 BID instead of the 1 BID as per plans.)
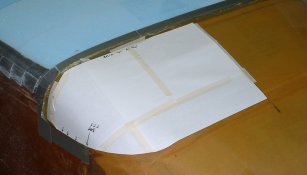
- After cure, I glassed a 3-BID, 1.5 inch wide layup over the inside perimeter of the nose door. The purpose of this layup is to add stiffness to the opening in the nose top and add thickness to the door perimeter for accepting the screws that secure the door to the nose top. I made a paper pattern first, as shown in the picture below. The dotted lines represent the cut lines. The darker, shaded part along the outer edges of the pattern depicts the 1.5-inch total width of this 3-BID layup. I wet out the 3-BID on the bench, cut out the 3-BID, and applied the layup onto the inside perimeter. I centered the layups over the cut lines -- one half onto the inside of the nose top and one half onto the inside surface of the door.
- After cure, I used my dremel and cut through the 3-BID layup along the existing cut lines made in step 1. I applied duct tape (for mold release) onto the inside perimeter of the door, being very careful to get the duct tape right up against the cut lines. I created the joggles by using the pattern and once again glassing in another 3-BID layup -- half the width onto the inside nose top, the other half extending onto the duct tape on the nose door.
- After cure, I used a razor knife to very carefully cut the little 1/8th-inch serrations. (Don't cut through the joggles!) The door popped right off. I trimmed the joggles to 0.8 inches wide as per plans, put the cover back into place, drilled the holes in the front corners of the door and joggles, and installed the nutplates. That's all there is to it!
- Once the nose top gets installed for good (floxed and 2-BID taped), I'll complete the aft joggle by taping the inside aft edge of the door (for mold release) and applying a 3-BID joggle from the smaller bulkhead ahead of F22 onto the underside of the nose door. That will occur further down the road, so check back in a year or so.

Canard Cover
The next step is to fit the canard cover to the canard, but I'll postpone doing that until I can fill and contour the canard.